LoRa APRS on 433Mhz
23rd October 2024I’ve dabbled with APRS over LoRa previously but failed to get anywhere due to a lack of other igates and digipeaters around the area. However! The project seems to have gained interest not only in are local area but also further afield and a number of LoRa based digipeaters and igates have popped up.
Don’t get confused with APRS on 2m (144.800 MHz) or APRS on 70cm (432.500 MHz) LoRa is different technology and its adopted frequency is 439.9125 MHz. You will need a ESP32 based device such as the Lilygo T-Beam or Heltec Wireless Tracker. Make sure when you order that you get the 433Mhz version as these are used for Meshtastic also and have a different transmitter chip onboard for the 868Mhz frequency.
You can find them on Amazon and eBay by searching: T-Beam Lora 433MHz or Heltec Wireless Tracker. The links here are valid as of the writing of this post and might not last long:
- Amazon: T-Beam Lora 433MHz
- Amazon: Heltec Wireless Tracker 433MHz
Once you have your device, installing the tracker software is super easy. There is a web based installer at this URL: https://richonguzman.github.io/lora-tracker-web-flasher/installer.html
With your device connected and using a supported browser you’ll be able to choose your device and the latest version and click the flash button

You’ll get a window asking to confirm the COM port, if you don’t have a COM port showing maybe try a different USB cable as you might not be using one that supports data communications. Let the installer run through the setup, you’ll have to click the confirm and finish buttons when its done.
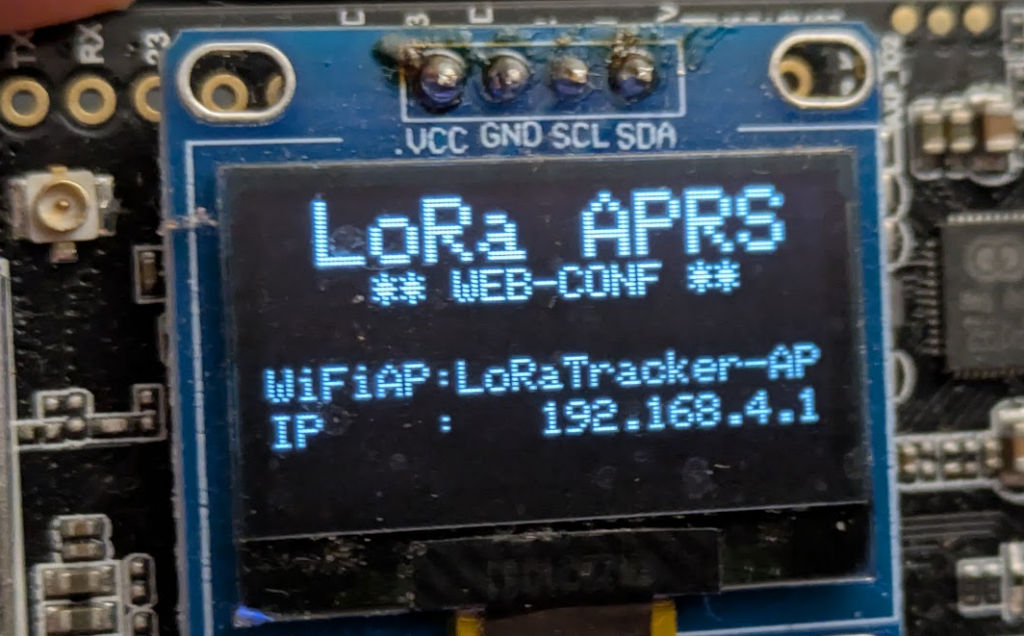
Your device will reboot and you’ll see on its screen a message about web-configuration:

Grab your phone and connect to the fresh new WiFi LoRaTracker-AP, the WiFi password as default will be: 1234567890
Once your phone has connected to that new network, open the browser and in the address bar goto 192.168.4.1 as shown on the screen. This will be the web based configuration section.

The first section you will need to enter your callsign followed by a SSID number, here I use -1. Its a commonly used number for a APRS Tracker. Each of the 3 are different profiles which you can choose by long pressing the button on your device. You might have -1 for your car, -7 when walking, etc. or different callsigns if on a club SOTA hike.
In the LoRa section you need to update the frequencies to show what is used here in the UK, update all three as they reflect the above profiles.


Finally, scroll to the top and touch the three lines (hamburger icon) and tap the Save button. Your device will reboot and be ready to beacon.
If you want to enter into the configuration again, double tap the button on your device to re-enable the Access Point and reconnect as above. To change between the three profiles its a long press on the button. There is a menu of options available too if you do a triple tap.
A single tap will force a beacon to be transmitted, but you’ll need to make sure you have a GPS lock first. These devices are not as good as phone GPS for locking onto signals, you’ll need to be outdoors and a clear view of the sky.
There is a LoRa dedicated map available at: http://lora-aprsdirect.sarimesh.net/?center=53.1579,-2.4706&zoom=10
And you will also appear on the APRS.fi map: https://aprs.fi/#!addr=Macclesfield%2C%20Cheshire
There are further enhancements you can make such as better antenna, external antenna for a vehicle mounted tracker, 3D printed cases, adding a LiPo or 18650 battery, etc. You can even add a BME280 sensor and include weather telemetry with your beacons.
Thanks should go to Richard G3CWI and Ray M1REK for hosting the current LoRa digipeaters and iGates in our local area.

